About this Website
To make your own website in this format, follow this readme at AuroLeap’s public template (Visible at www.example.auroleap.org, built from github.com/AuroLeap/PublicWebsiteTemplate) .
Follow this guide to produce an entire website from repository creation to website access.
Note this template is oriented around Antora’s standard template. There are many different styles and templates available to act as groundwork for a website. Other considerations that have not been pursued:
A walkthrough of this tutorial can be found at {Future hopeful YouTube link placeholder here}
This website is constructed using the following services and tools, note that most of these are free or low cost.
| Aspect | Provider / Service |
|---|---|
Domain registration and reservation |
Cloudflare |
Website hosting |
Cloudflare (Free, Generated from static generation script, linked to GitHub repository. Provides autogenerate website preview from branches and publication automatically) |
Website repository |
GitHub (Free, Private repository) |
Static Generator |
Antora |
Website Content |
Almost all content is written in adoc |
Content Editing |
IntelliJ IDEA Community Edition with adoc plugin |
Graphics Editing |
Inkscape for SVG images, Gimp for others |
Domain / Website reservation through Cloudflare
-
Create a free account at Cloudflare (www.cloudflare.com/)
-
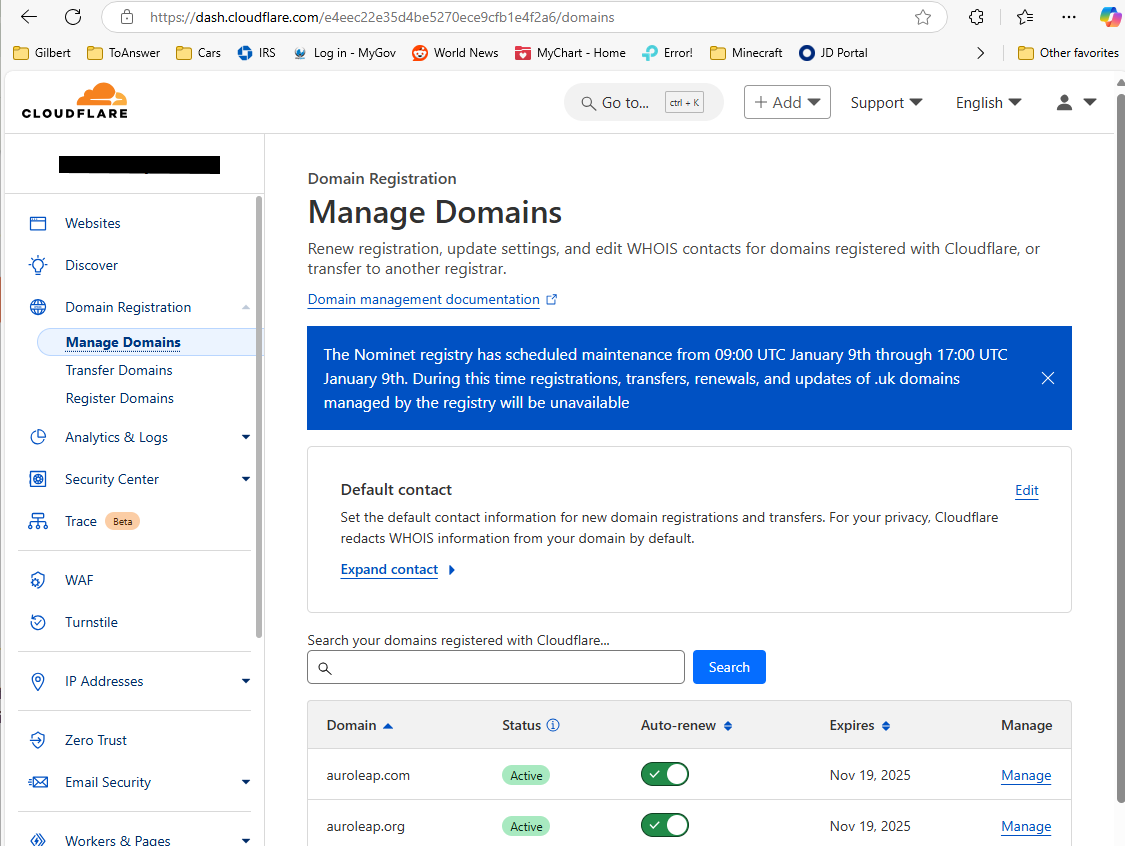
Browse to "Manage Domains" underneath the "Domain Registration" drop down on the left side.
-
Search for and purchase your respective domain.
-
Alternatively, use a domain under a free service, for example, from freedomain.one/. Note this will likely not be able to take advantage of build services directly from CloudFlare, but could still be published as a part of Git Automations.
Getting your computer ready.
-
Install Fork for repository management. (git-fork.com/)
-
Note there are many other alternatives available here, I prefer fork for it’s ease of use.
-
Note the IDE (integrated development environment) listed below and many others support git repositories inherently, but
-
-
Install PodMan
-
Podman is used to build the website using a container (so that all dependencies are executed run from a single scripts, and can easily be called from a different build environment, such as a build server - in this case from CloudFlare)
Set up your website by maintaining its files on GitHub
| There are many different repository hosting methods, GitLab and GitHub are the most popular. Cloudflare has integrations build in for GitHub and GitLab, and likely others. For the purposes of this tutorial, |
-
Create a github account
-
Create a github repository
-
Option 1: Create a fresh repo.
-
docs.github.com/en/repositories/creating-and-managing-repositories/quickstart-for-repositories
-
Copy the entire contents of this repo to your new repo to get started.
-
-
Option 2: Fork this repo to your new repo.
-
Pull your new website and test generation of your static site using Antora
Note: If you’re familiar with reposition cloning and synchronization, you can skip this section entirely.
Note: Again, there are many different tools you can use to maintain your repository.
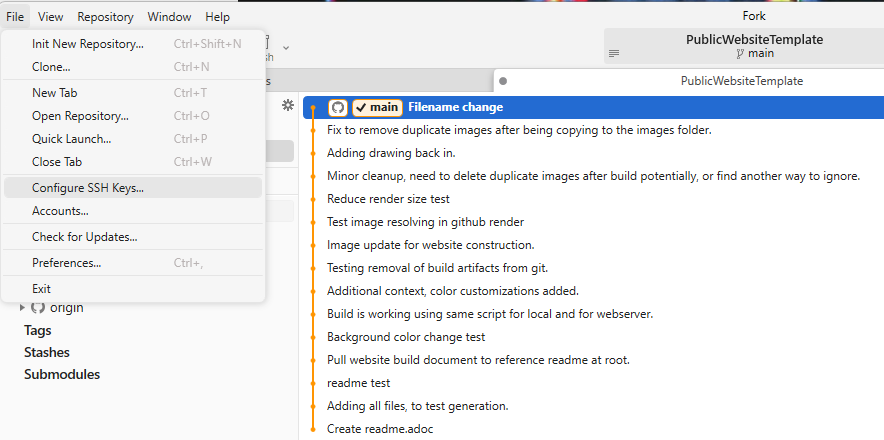
Using fork, create an SSH key and import it into your GitHub account.
1.Browse to "File"⇒ "Configure SSH Keys…"
:
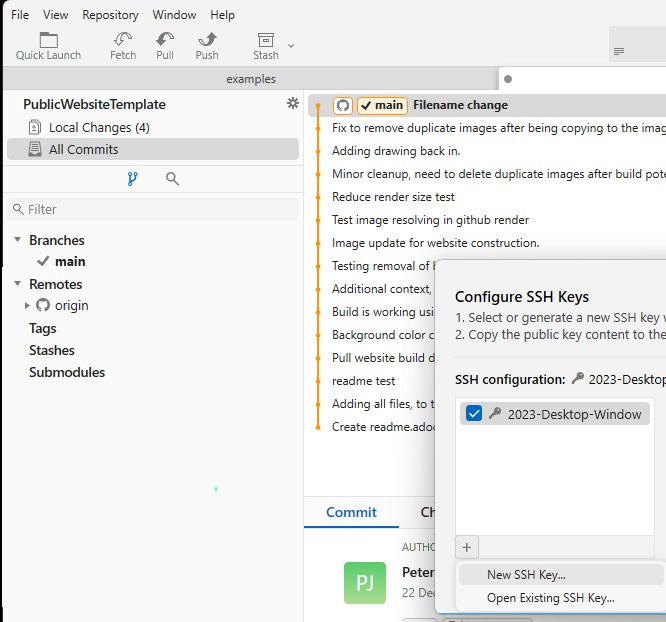
2.In the popup window, press the "+" button ⇒ "New SSH Key…"
:
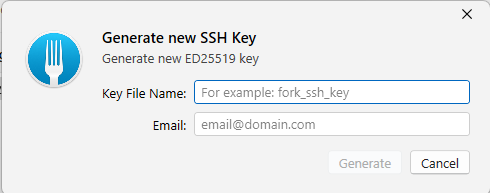
3.Enter a name for your key and an email to associate to commits made using the SSH key. I usually name the key something related to the computer and year, since this key is per computer.
:
You will now see your public SSH key listed in the window. This is what must be copied and added to GitHub in order to ensure you can clone repositories from GitHub using Fork.
Upload your new SSH key to GitHub.
Now that you have connected your generated ssh key from your pc to your GitHub account, you should be able to clone and push to your new GitHub repository.
Clone your new repository.
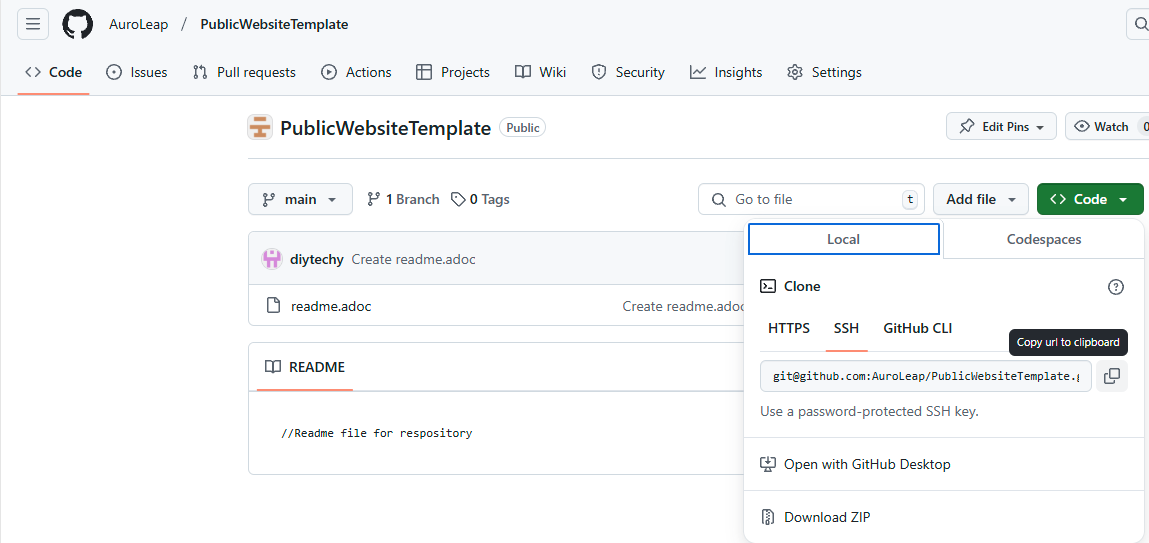
1.Copy the GitHub SSH url using the "copy" link provided on GitHub
:
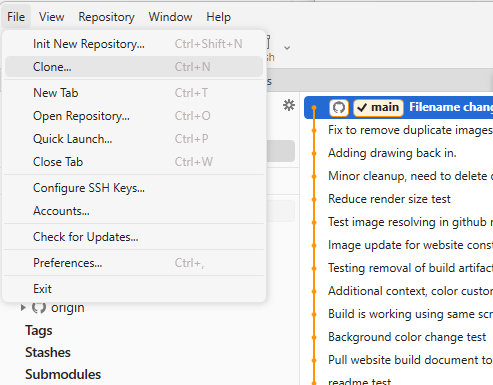
2.In Fork, browse to "File"⇒ "Clone…"
:
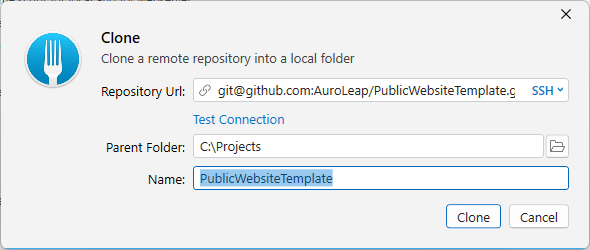
3.Since you just copied the SSH link to your repository, the "Repository URL" field should already be populated. Set the parent folder and "Name" (which will be the folder) where you want the contents of this reposition to be checked out to on your computer.
:
Test local website generation.
1.Now that the repository is checked out, the local podman container can be built, which is called from the build script to ensure an isolated environment.
Note: This certainly is not required, if you are in a linux environment all dependencies could be checked out locally and built by directly running the "Build.sh" script. But this route was taken for consistency and for an isolated environment that can avoid conflicts with the users desktop environment.
-
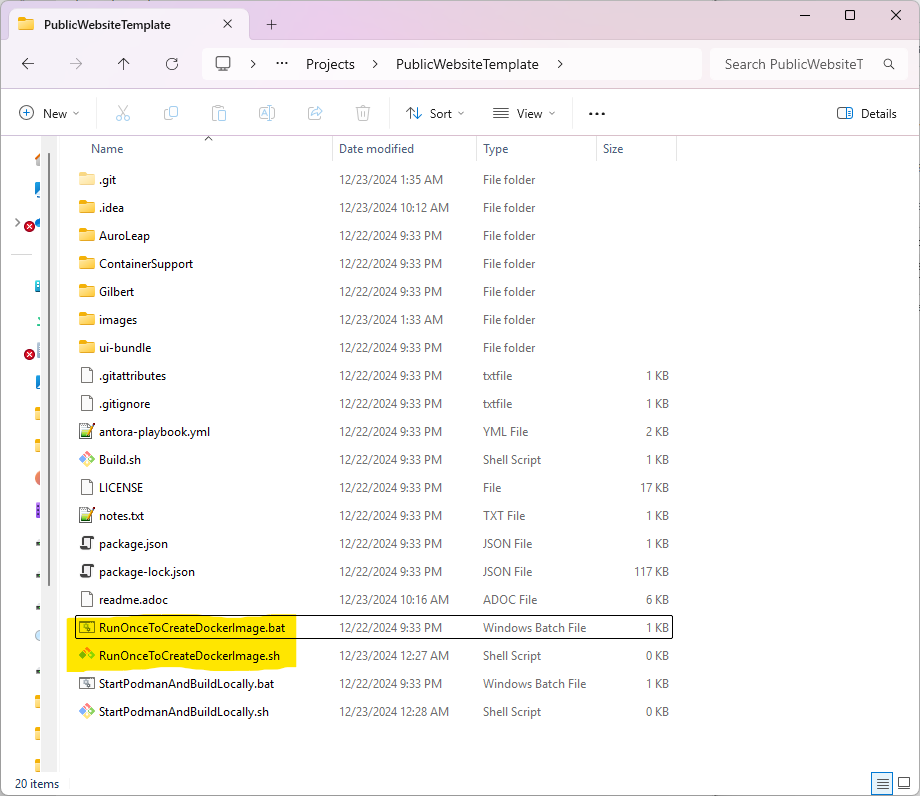
Run "RunOnceToCreateDockerImage" (bat on Windows, sh on linux) from the folder either by double clicking (on linux you will need to be sure to make this script executable) or through terminal.
| If you did not already start podman or allow it to automatically run after install, you will need to manually start it before running this script. |
:
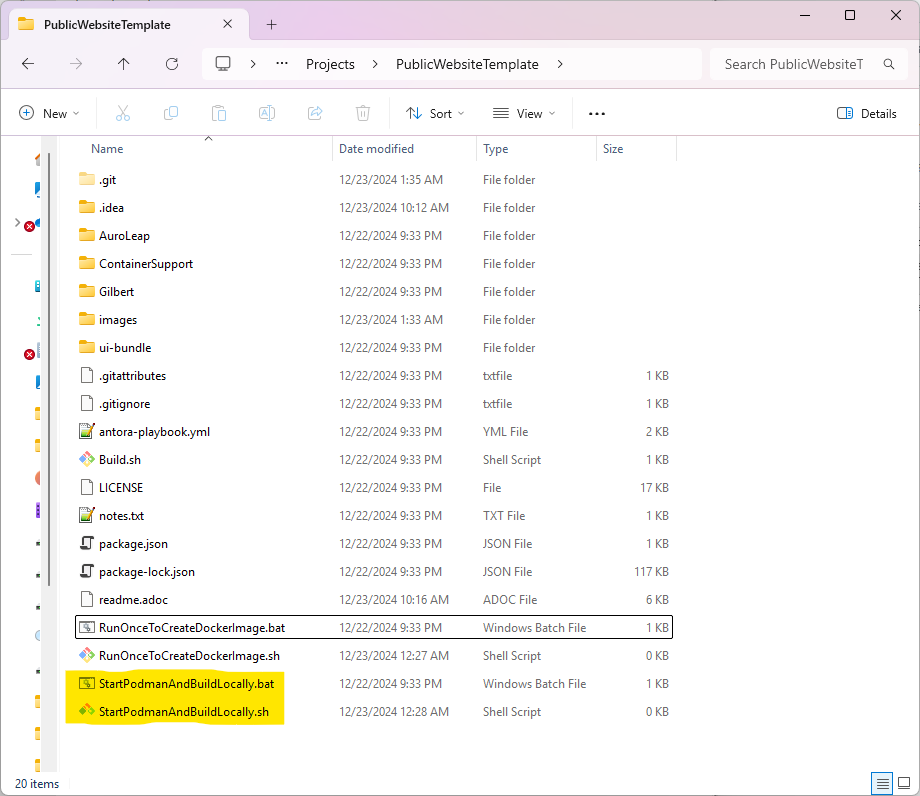
2.Now run the build script to see if the website can be built on your computer.
:
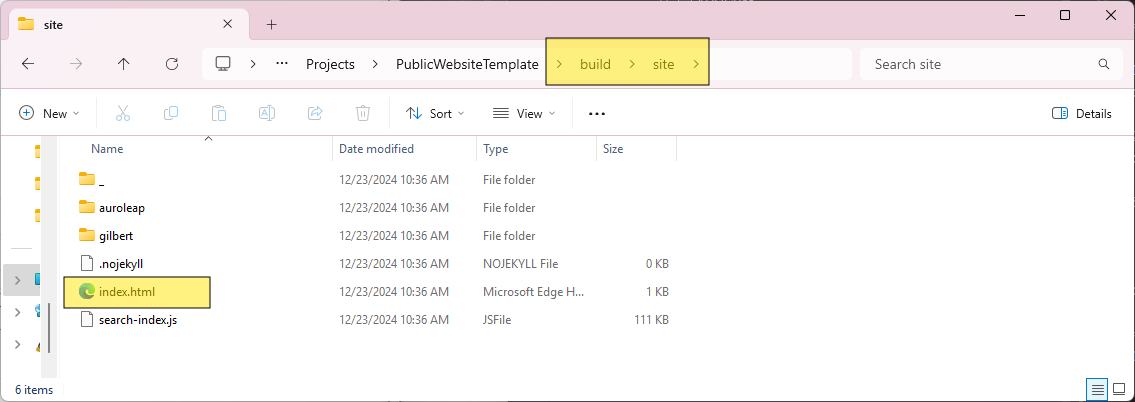
3.If everything was successful, you can now browse to the build path and open "index.html" to browse your locally built website on your pc.
:
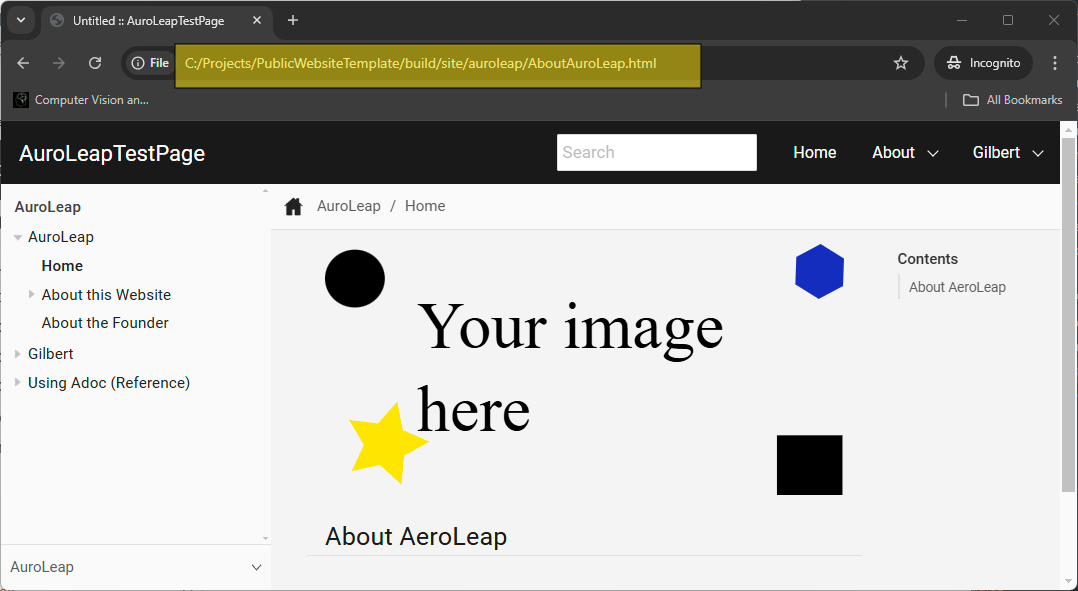
4.You should now see your site in your browser.
:
Push your changes (if any) back into your repository.
-
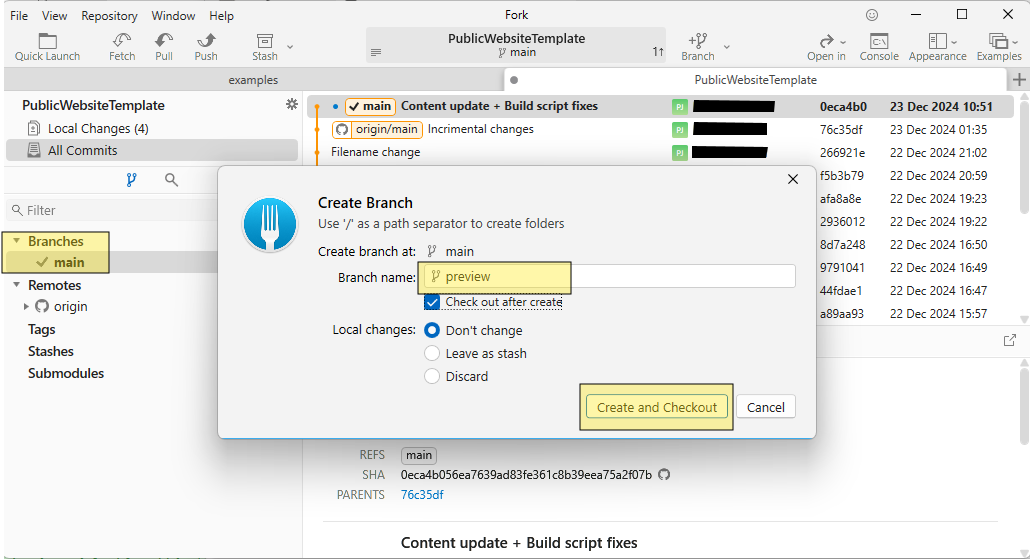
Now that your website is built, make sure to save any changes and push them back using fork or an equivalent git repository manager. First view your website repository again in Fork. In general it is best to commit all your changes to a separate branch from the main repository, so that you can see all changes reflect in a preview website view before deploying them to a fully public accessible site. To do this, create a branch first using Fork by right clicking the primary branch (usually "main") and setting a custom name. :
-
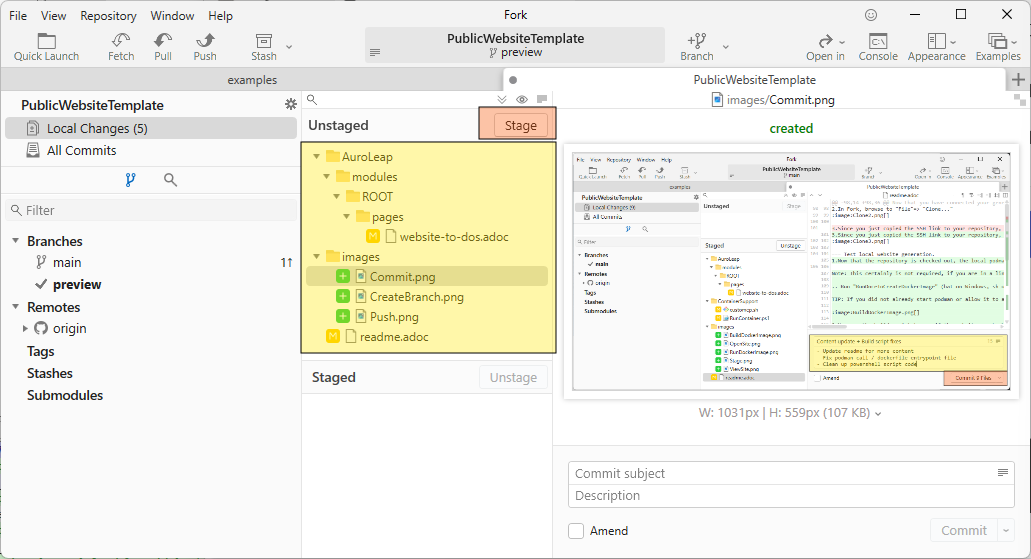
Next select all the files in the "Unstaged" area you would like to be pushed back to the online repository by either ctrl+left-click or shift+left-click (to select a range), and press "stage". :
-
Once they are staged, you can enter a description and press the "commit" button. :
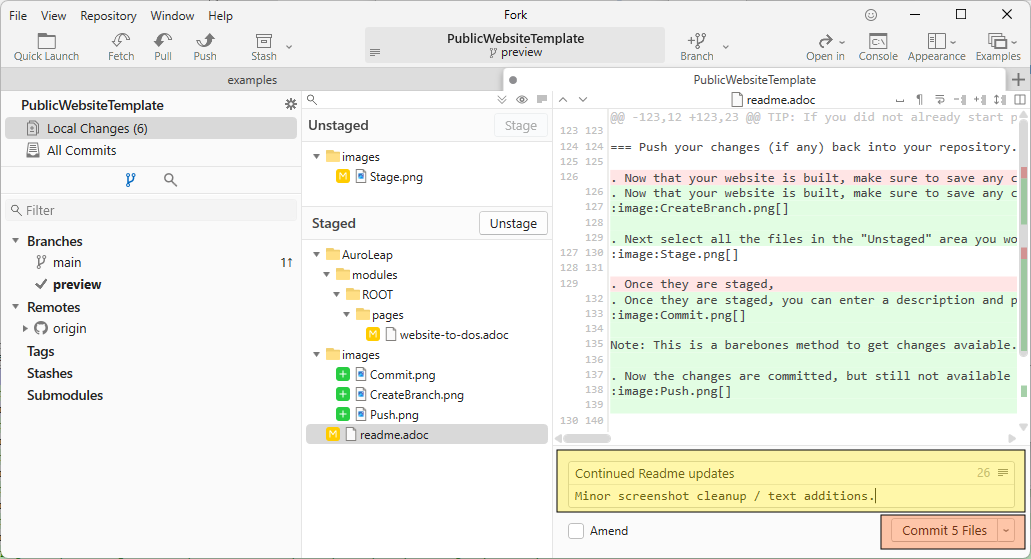
Note: This is a barebones method to get changes avaiable. Moving forward, you would likely want to create a branch in GitHub to seperate content that is ready to release from content that is
-
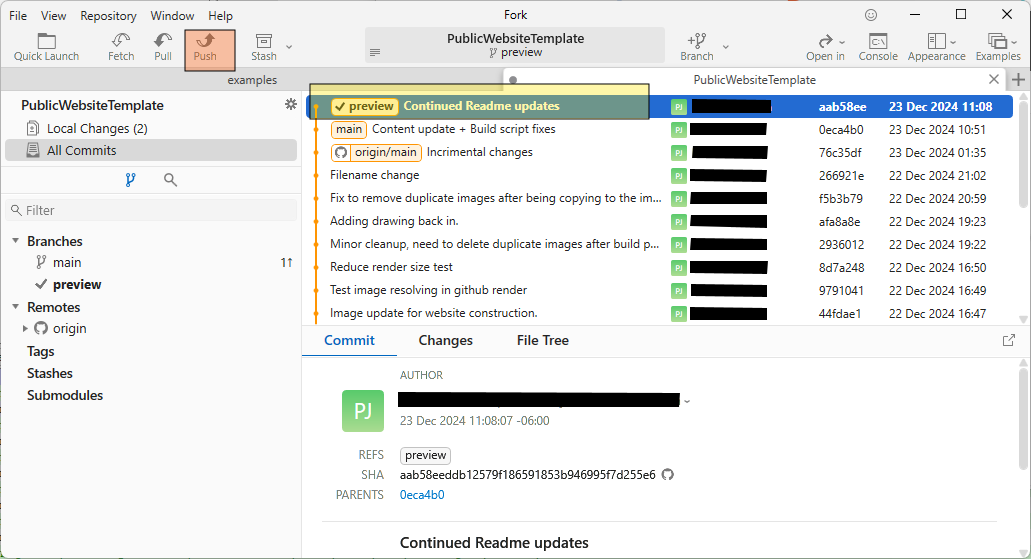
Now the changes are committed, but still not available in the online repository you created earlier, which will be necessary for Cloudflare to build the content and publish the site. To finalize this, press the "Push" button. :
Allowing Cloudflare to build your website automatically from GitHub
Link GitHub to Cloudflare
The final step in the process is linking CLoudFlare to your GitHub repository and allowing it to build your site.
-
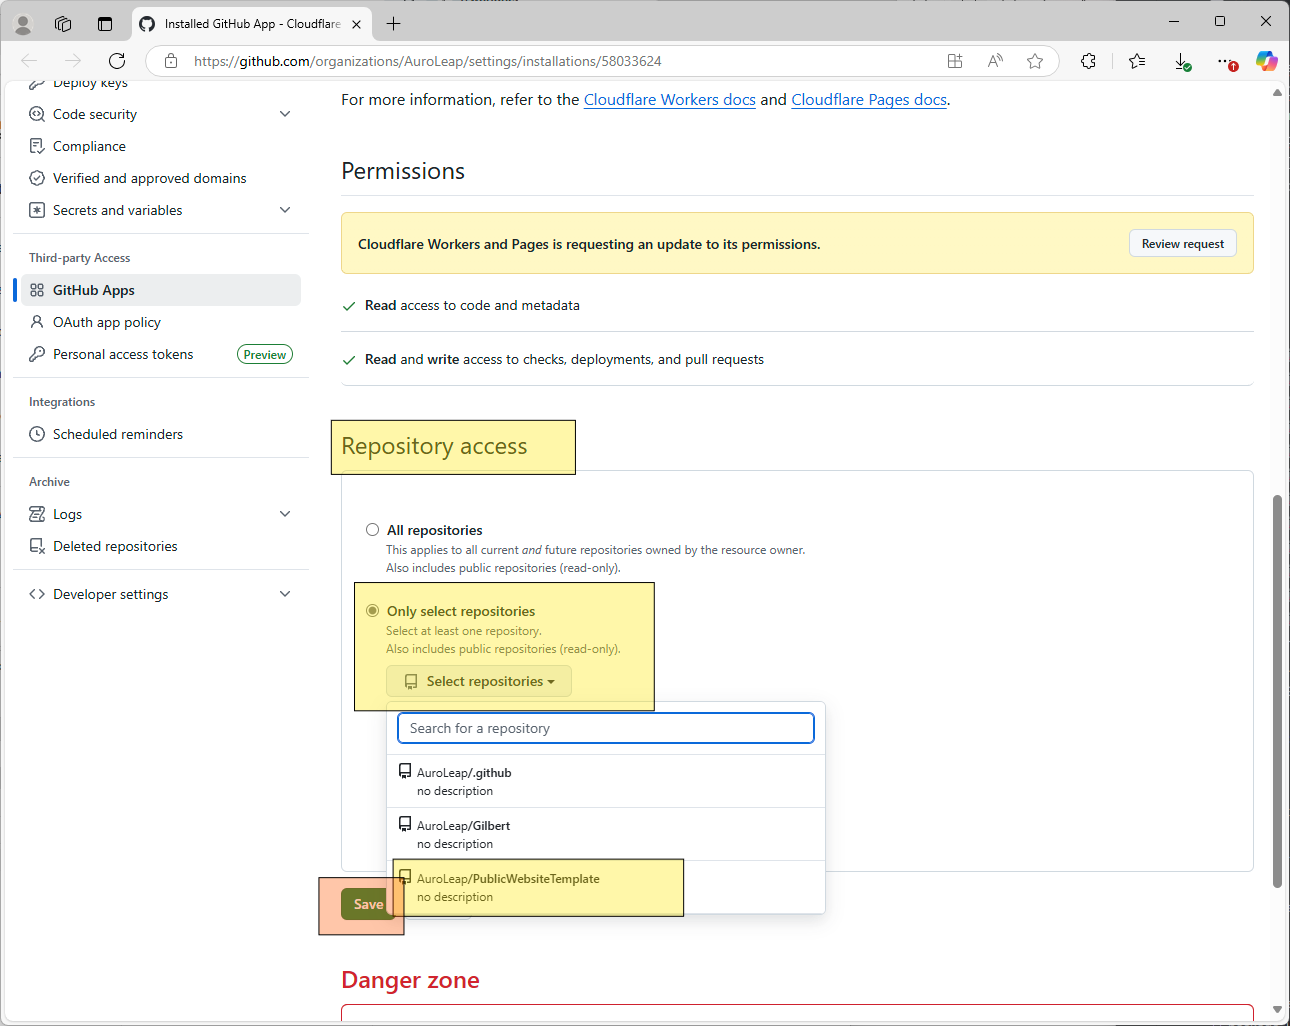
Make sure GitHub is allowing access to the repository in question. A link directly to CloudFlare permissions in GitHub is here Scroll down on this page till you see the repositories Cloudflare is able to access. I prefer to restrict this, but you can also give Cloudflare access to all repositories. Don’t forget to press "Save" after adding this. :
Setup Cloudflare to build a webpage from your repository
-
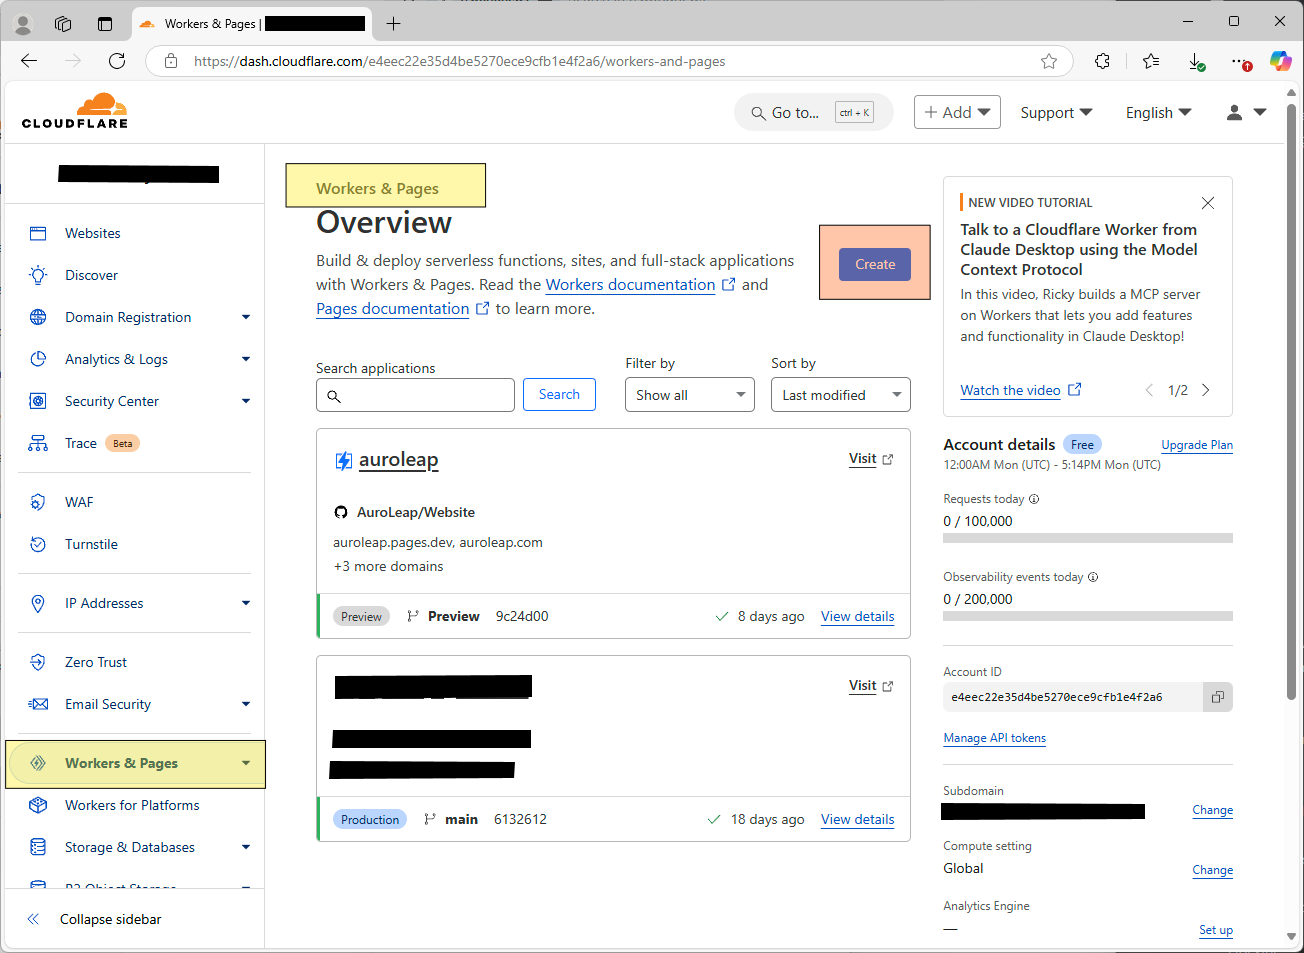
Go back to the CLoudFlare dashboard, and on the navigation panel on the left side, select "Workers & Pages" :
-
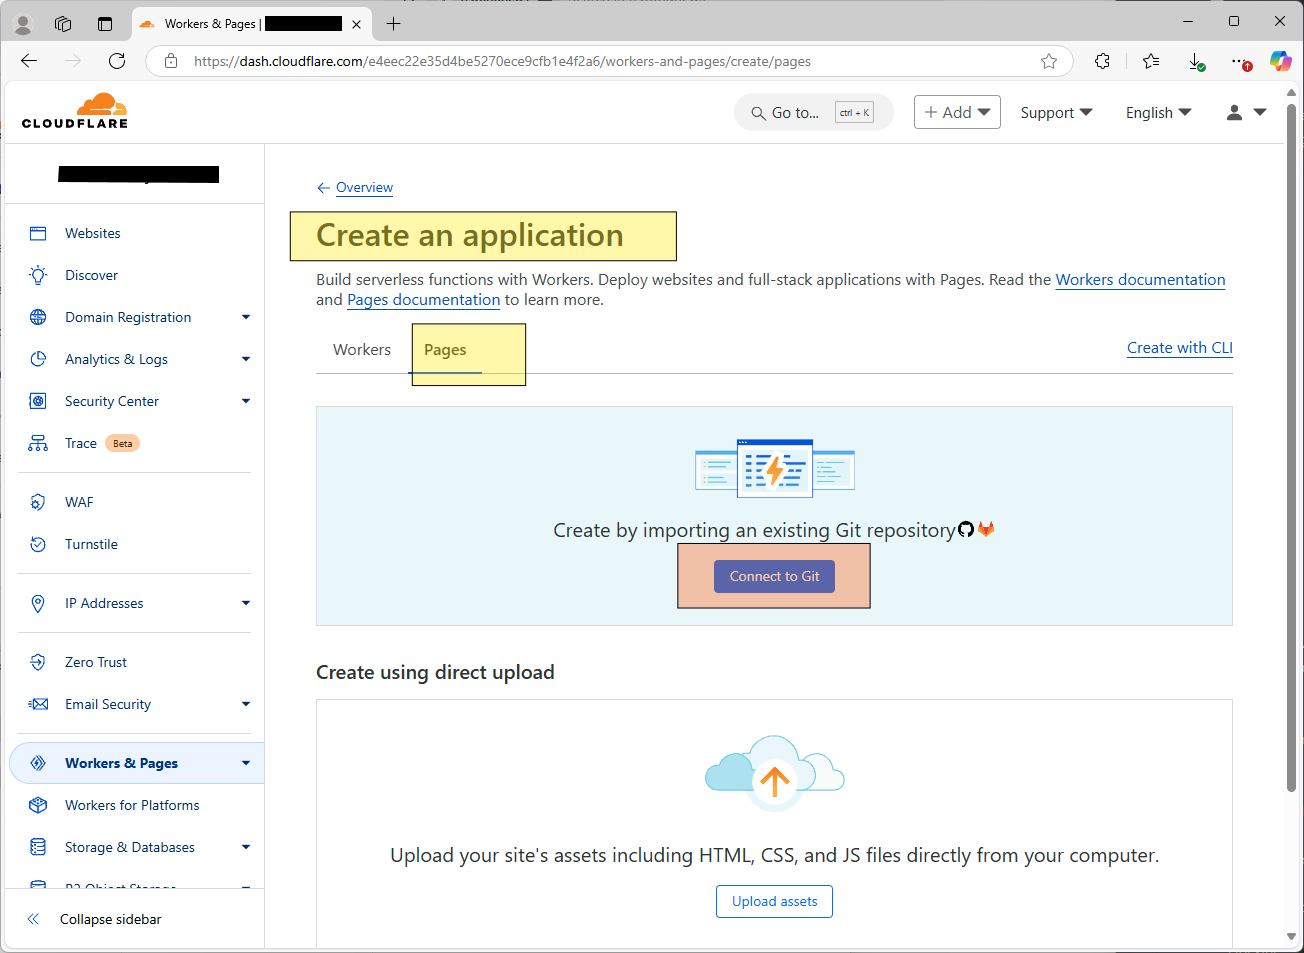
Make sure "Pages" is selected, and press "Connect to Git"
Note: If you are hosting your repository through a different service, you will need to find the respective method to connect CloudFlare to your repository.
:
-
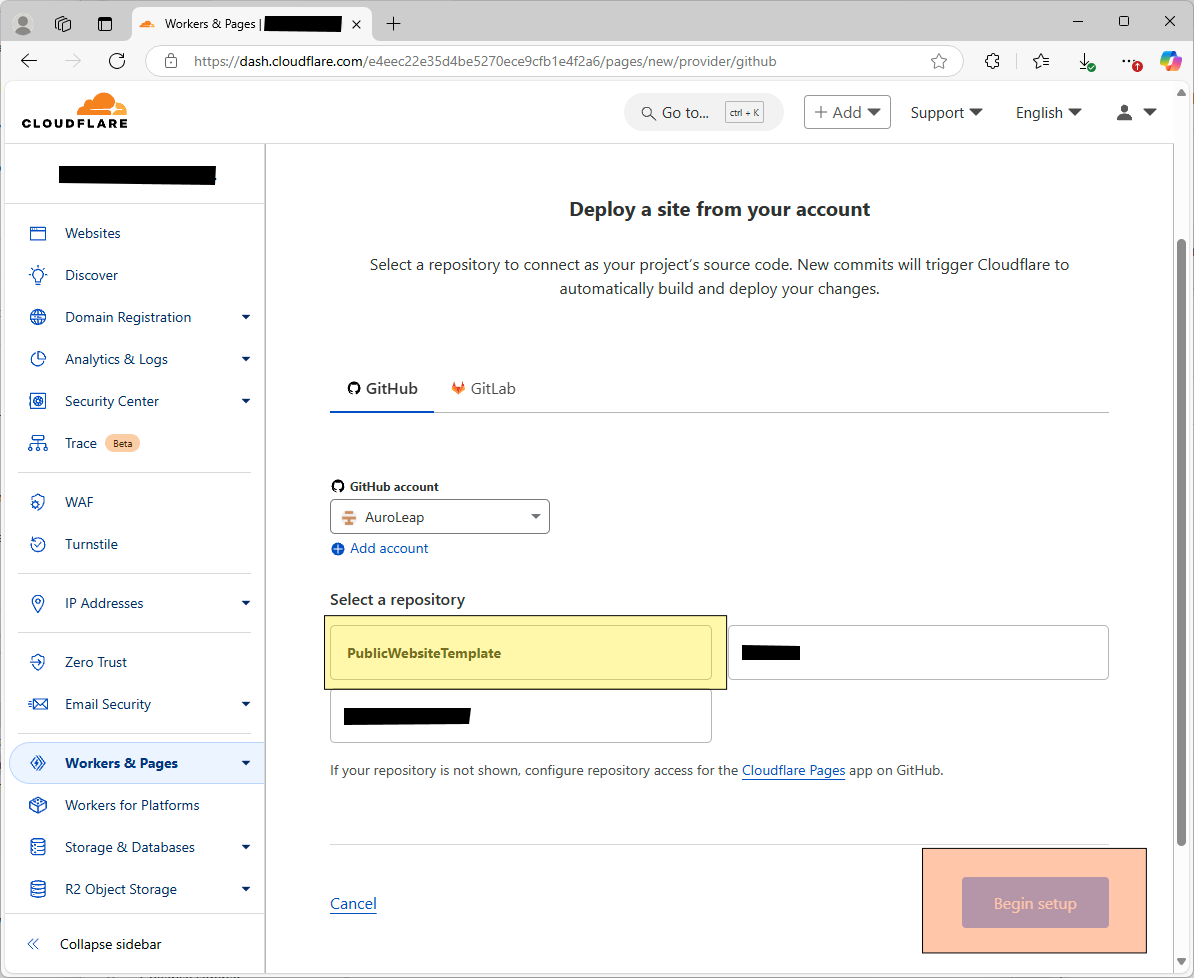
You should now see the repository you gave access to earlier in the list presented. Select it and press "Begin setup" :
-
You will be presented with a few options here. Set your project name, you can keep the "Production branch" as main (note this is NOT the same as the branch I showed being committed to above, this is on purpose, I will return to it shortly). Other build settings:
-
Framework preset: None
-
Build command:
-
bash Build.shNote: This is the same script that the container calls when running the build script.
-
Build output directory:
build/site: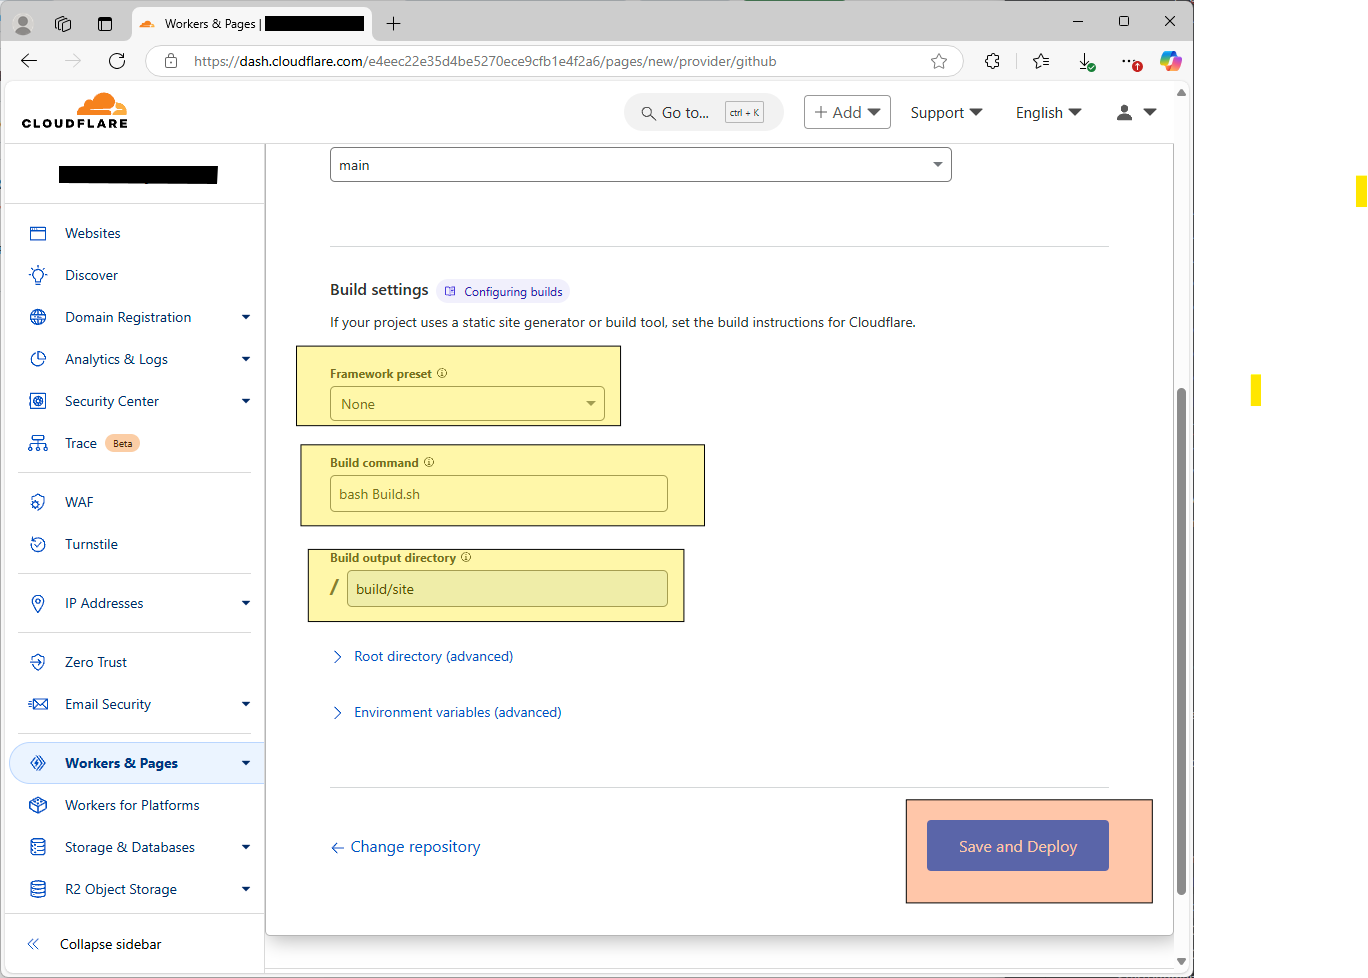
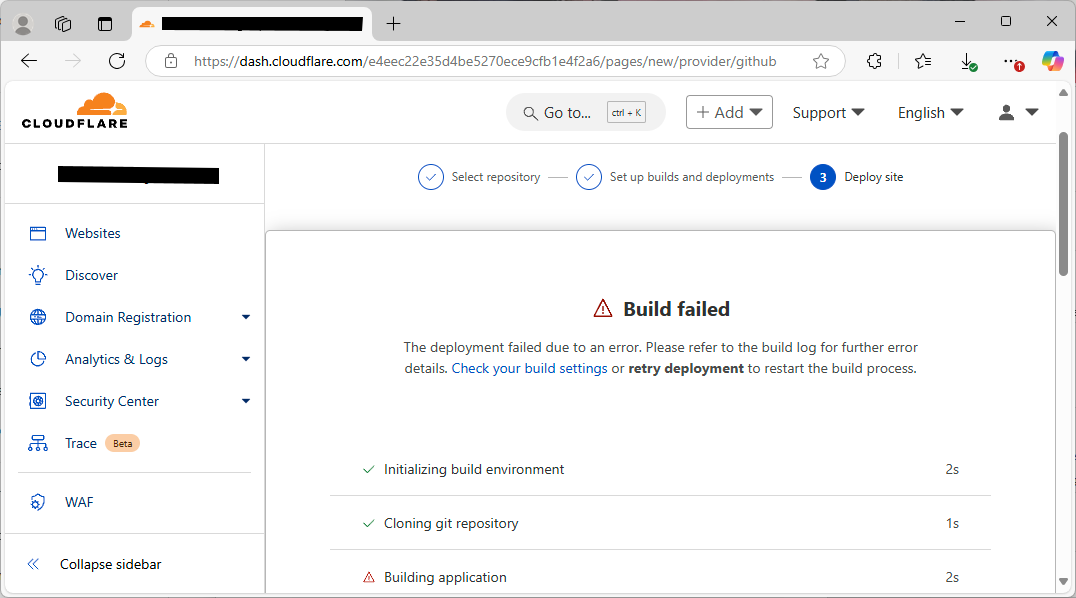
After pressing "Save and Deploy" you will notice the build will fail. This is expected.
:
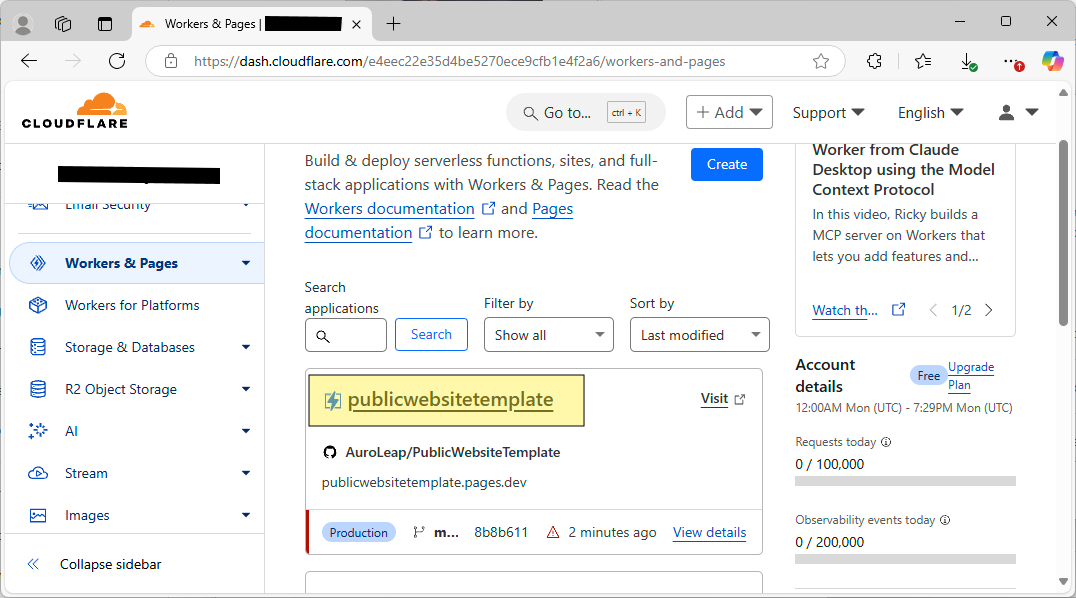
Go back to "Workers & Pages" and click on the deployment you just created.
:
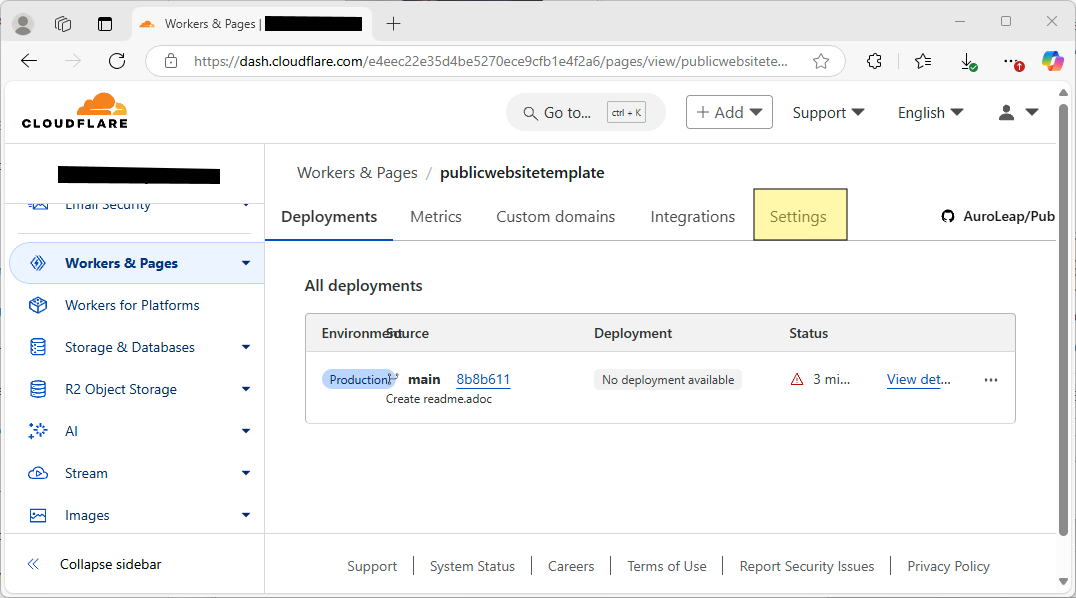
Go to settings
:
Scroll down to "Branch control" and go to edit.
: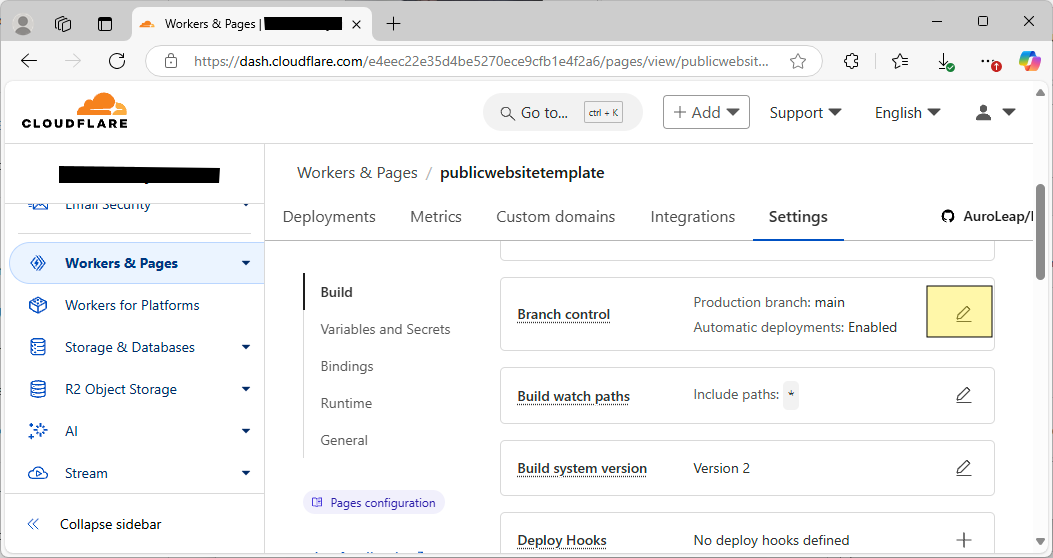
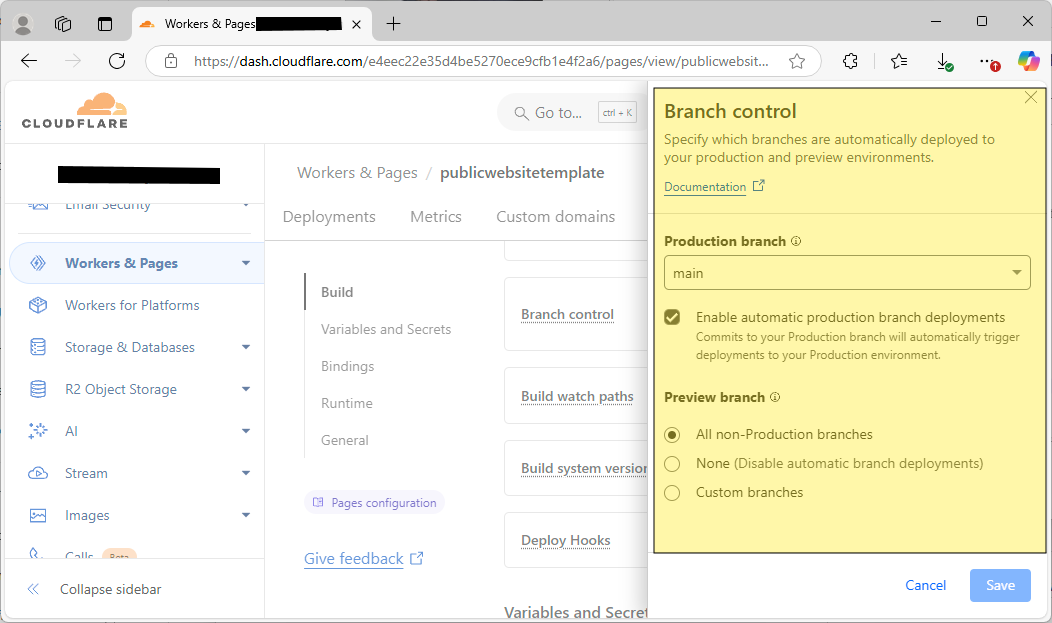
Here you will notice the "Production branch" is designated as "main" or whatever the default branch is of your repository unless you changed it earlier. Since we pushed to a different branch, the "Build.sh" file doesn’t actually exist in this branch, causing this build to fail.
However, you will notice below is the "Preview branch" where by default all non-production branches are considered for preview.
:
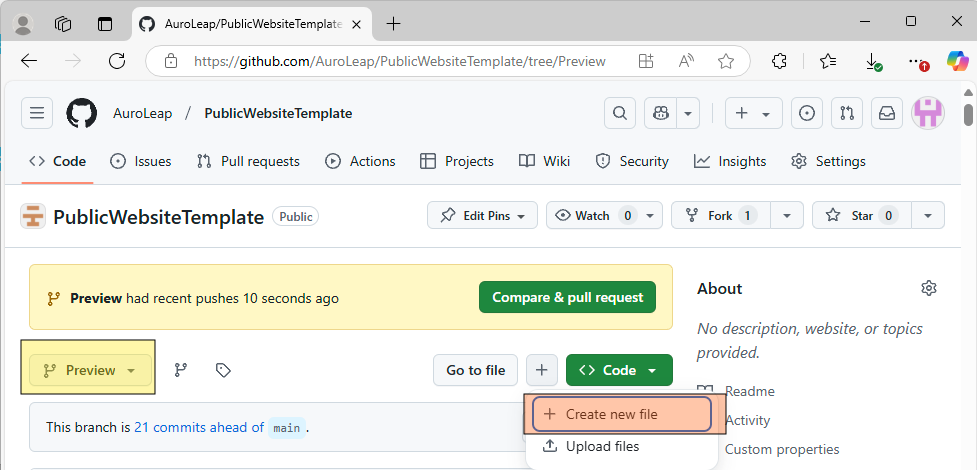
Got to Github, to the branch you previously pushed to. In order to trigger a preview build from Cloudflare, you simply need to push any change into any branch other than the designated production branch to see a preview.
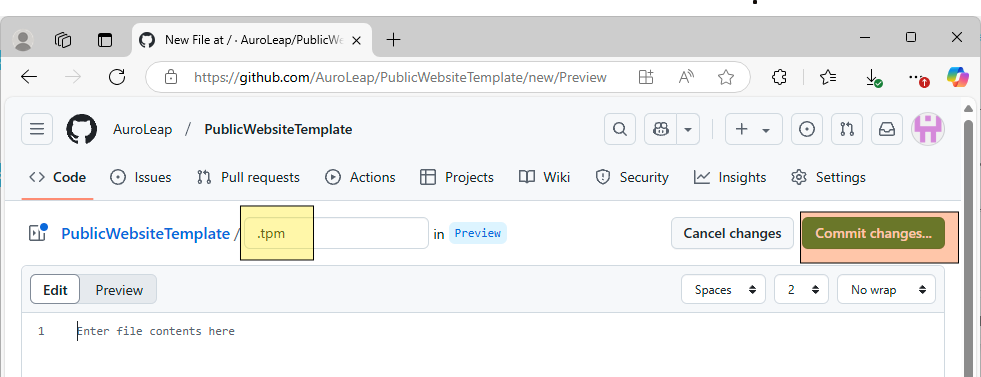
Simply creating a blank file and committing this back (which can be done directly through GitHub) is sufficient to trigger Cloudflare to attempt to build a preview.
Make sure you are in the branch you pushed to earlier before proceeding here.
:
Again, this just needs to be an empty file, the point here is to have a commit after linking to a Cloudflare deployment, which will automatically trigger Preview creation.
:
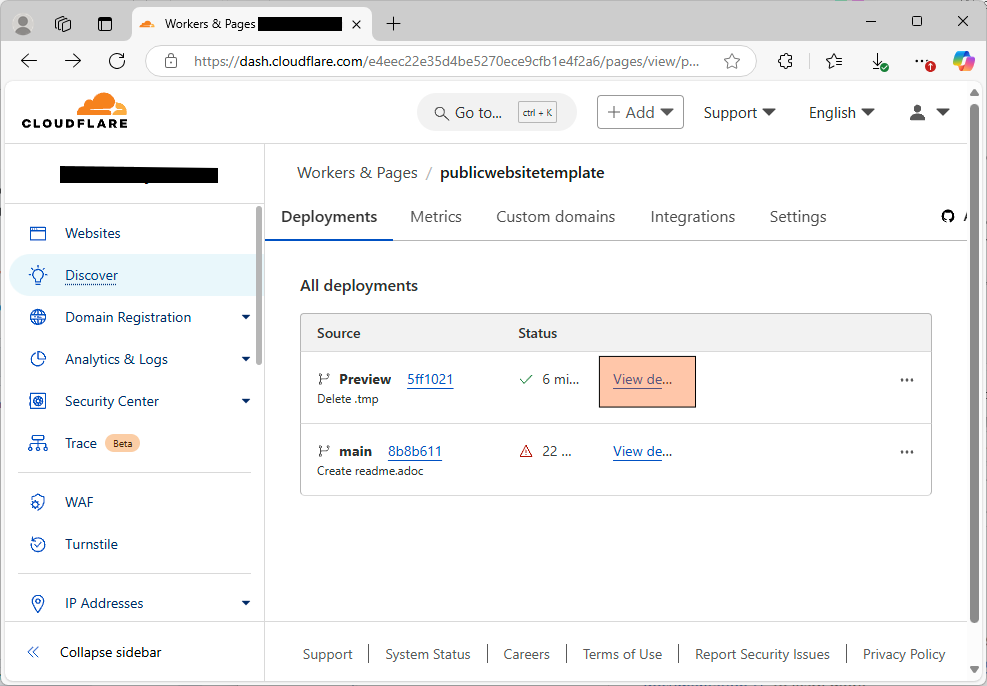
After committing, go back to Cloudflare pages. You should now (or very shortly) see a green status with a "Preview" designation.
You can now enter the deployment details.
:
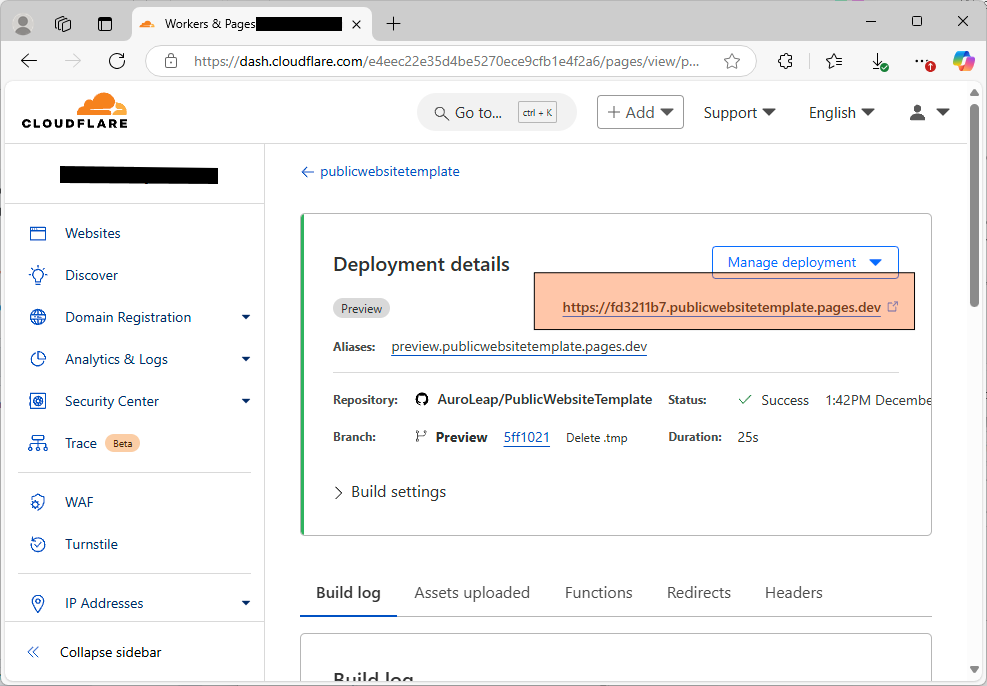
And then you can press the jump link to see the preview site.
:
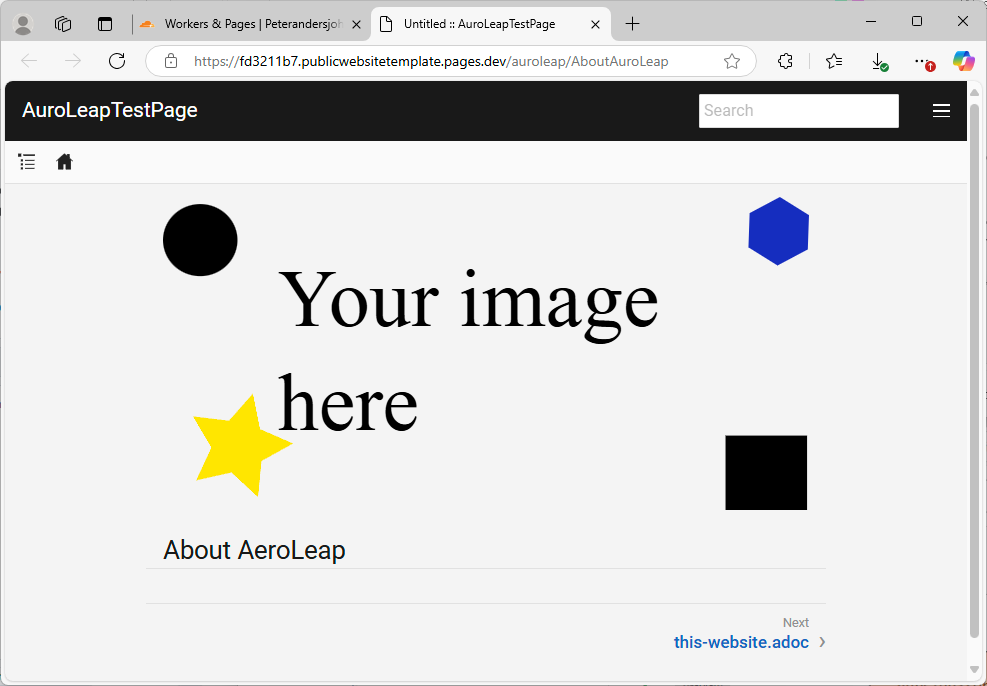
And now you can see the site you previously pushed into the branch.
:
Create a pull request to get changes from your preview into your production deployment for Cloudflare.
Note: If you are familiar with pull requests, reviewing this section will probably bore you. This is only reviewing how to create a pull request from the preview branch to the designated Cloudflare production branch (which by default points to the default branch of GitHub, which is "main" if you have not changed it)
Note: Of course you can just push changes directly to the production branch on GitHub, skipping the preview and pull request process entirely, but this increases risk you accidentally push a change that breaks your website before you notice.
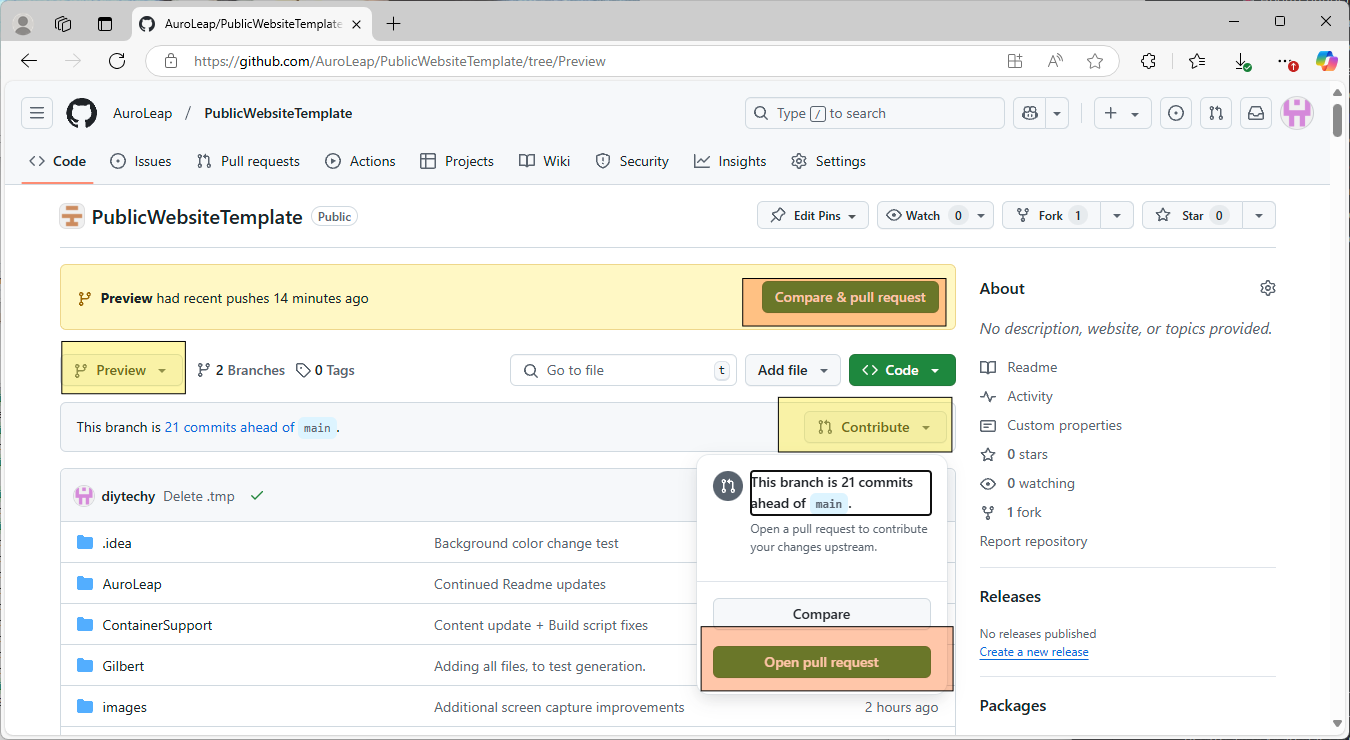
If you want to get this preview into your "Production" build, you simply need to pull those changes into whatever branch in GitHub has been as the Production build. This is most readily done by performing a Pull Request through GitHub. Sometimes this will be prompted when you visit the branch in GitHub, and there are many access methods, but normally this is always accessible by opening the "Contribute" and pressing "Open pull request"
:
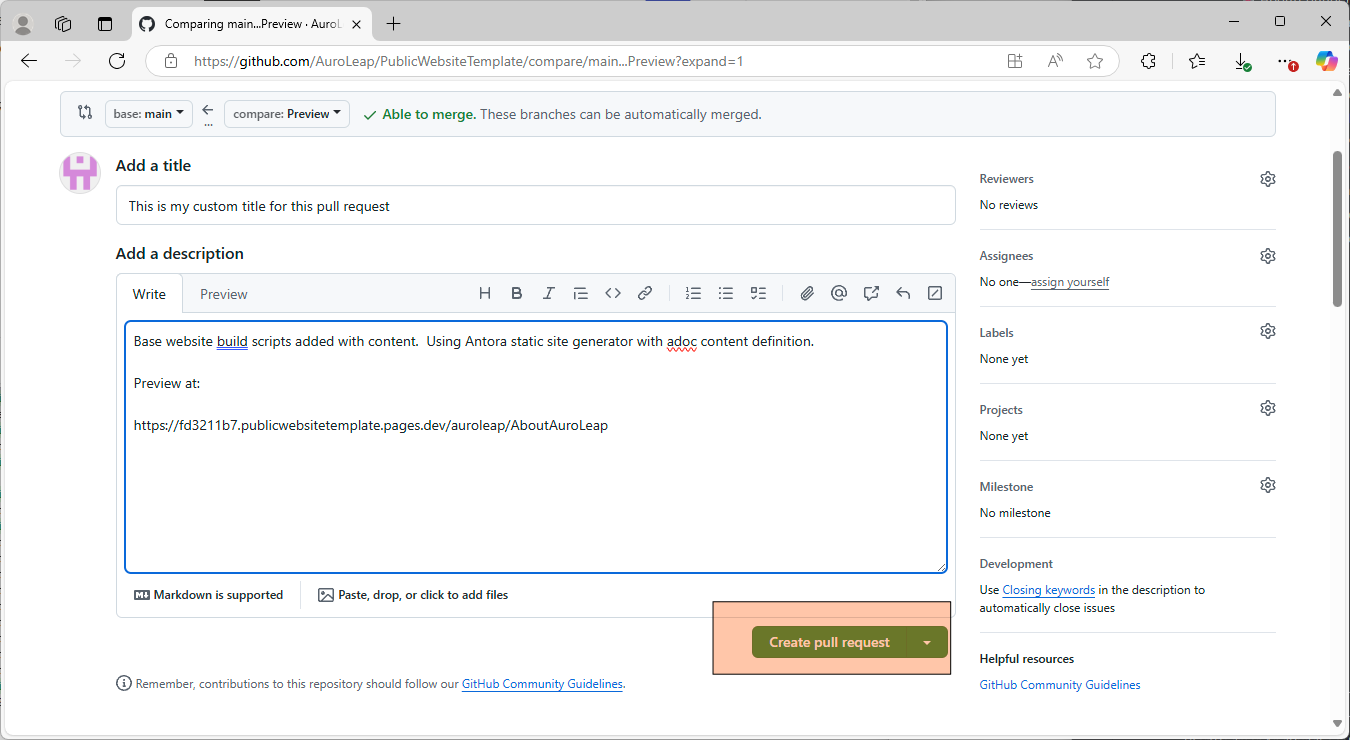
Add details to your pull request, this would also be the same avenue someone might review your changes before deploying them to production. You may wish to put a link to the Cloudflare preview for review.
Once done, press "Create pull request"
:
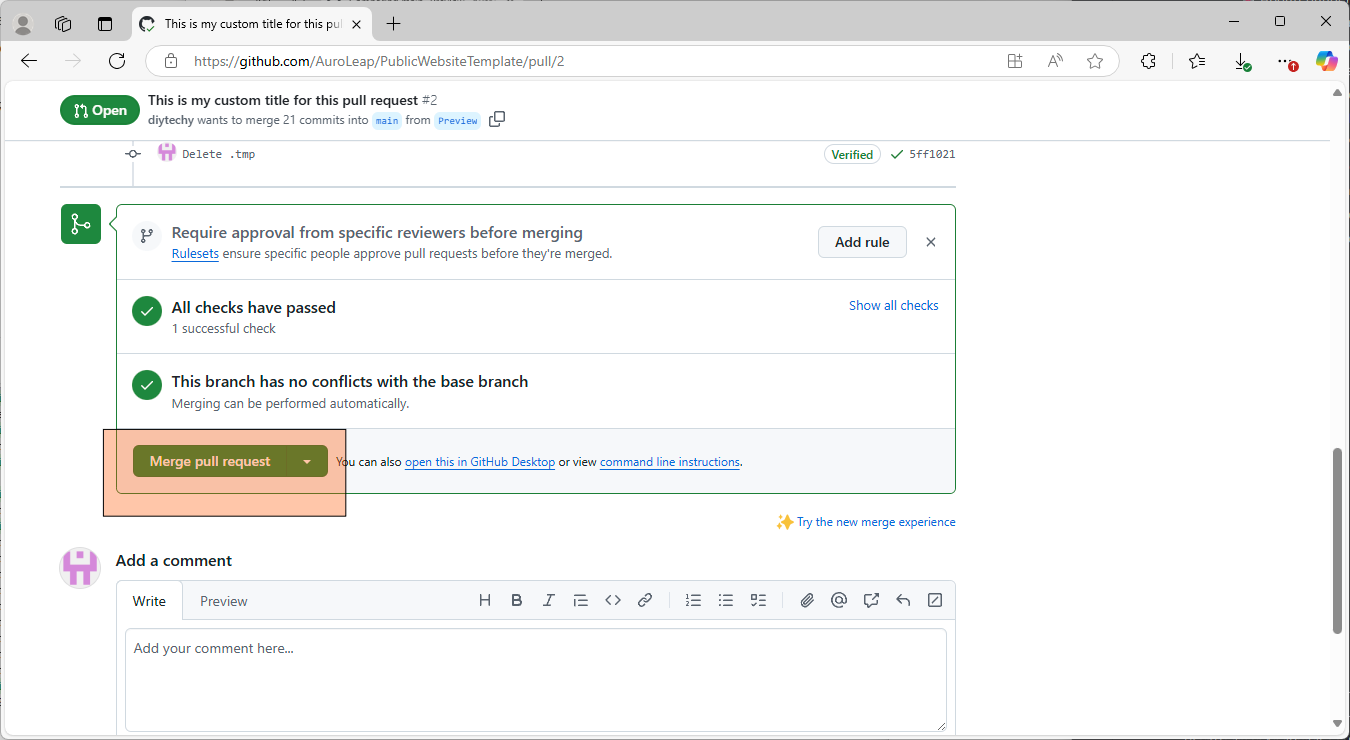
If you don’t have anyone else to review, and just want to get this pulled through, just scroll down to the bottom and press "Merge pull request" once GitHub is done performing it’s checks. Note there are a substantial number of additional checks that could be configured here.
:
Verify your production deployment and connect your URL
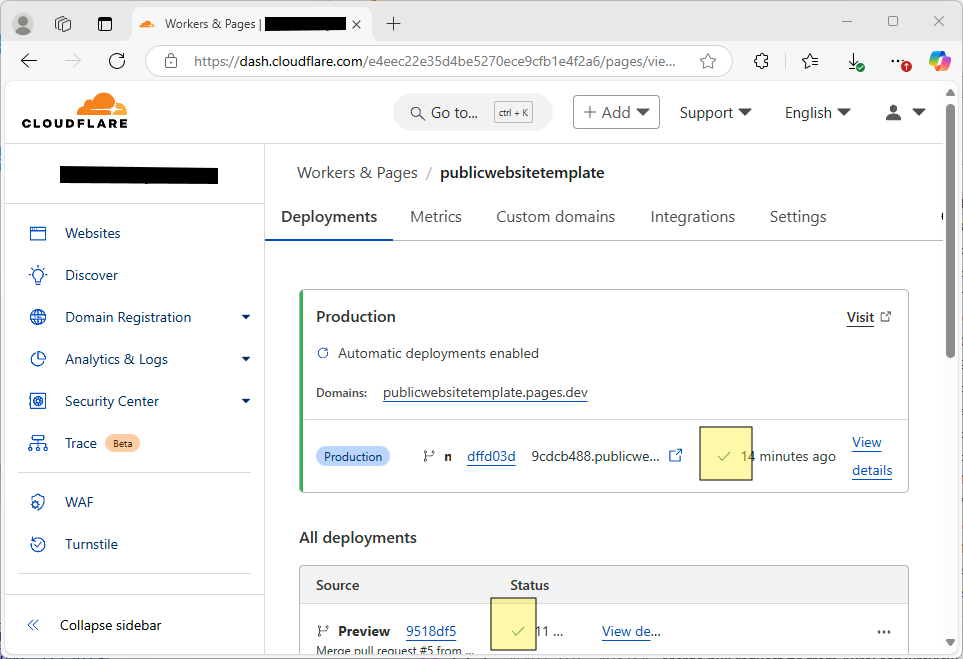
Now if you browse back to your deployment on Cloudflare, you should see the production and preview both in a green status.
:
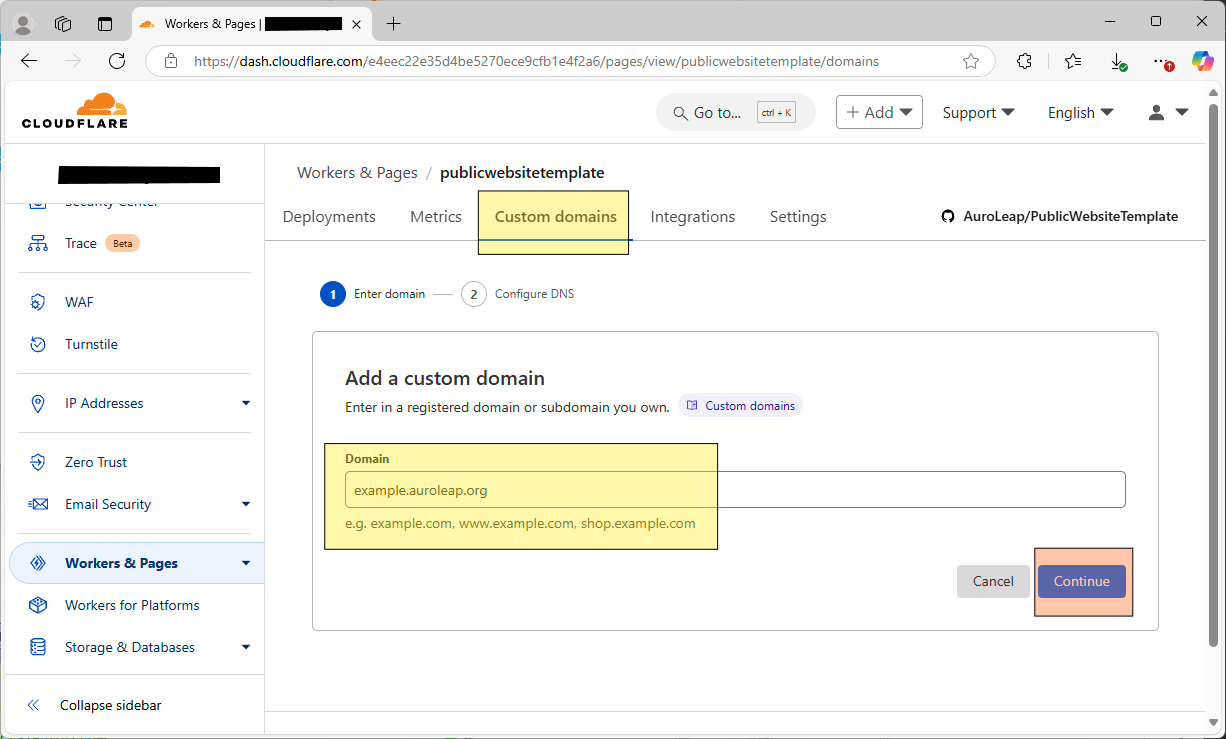
Now you can tie this production deployment to your url. Press "Custom domains" and enter your custom domain:
:
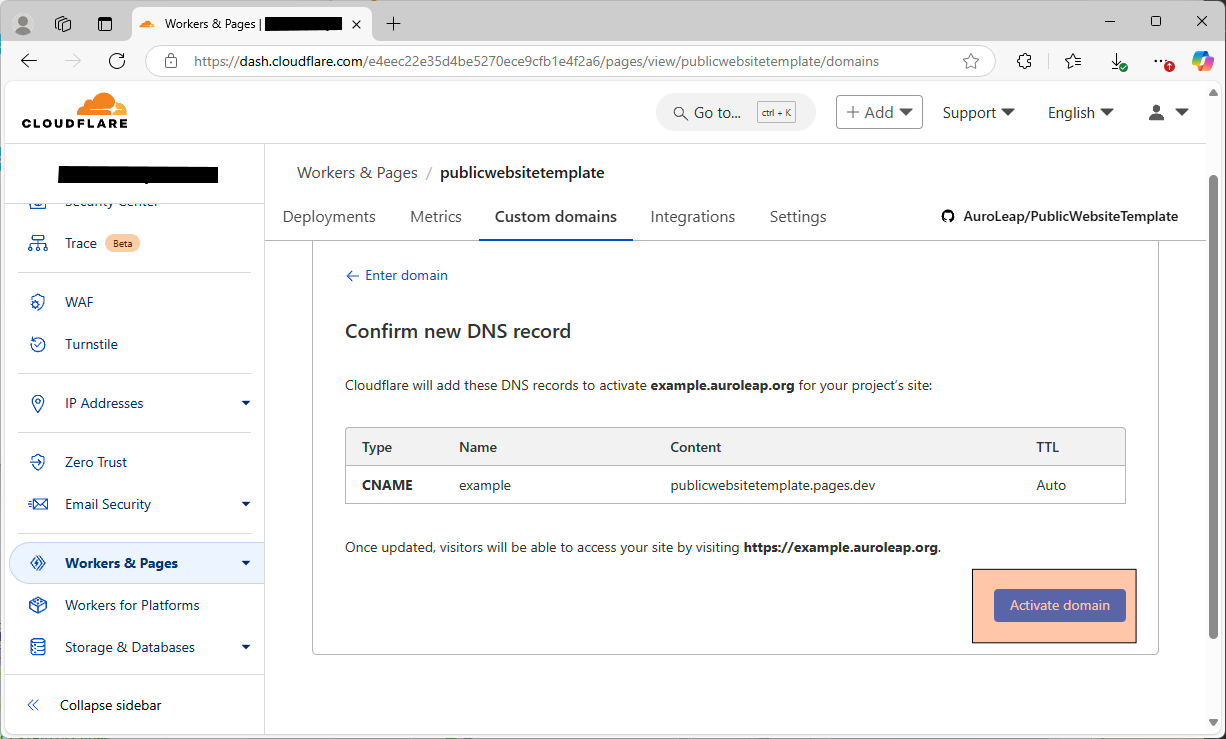
And finally confirm the new DNS record.
:
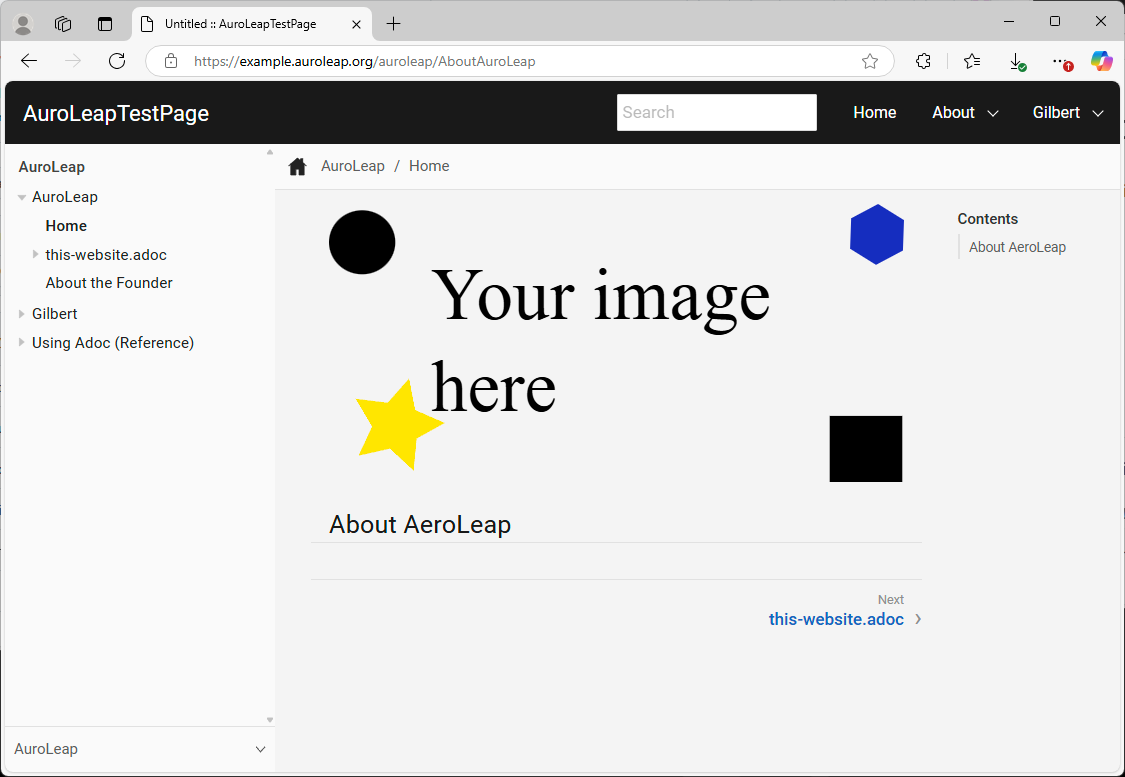
After a few minutes (and this may take much longer depending on your DNS provider and their refresh rates / update rates from Cloudflare), you should be able to visit the site by typing it into your URL:
:
Note: Now that any changes you make to the non-production branch will be visible through a preview on Cloudflare, and when you are ready to deploy those to production, it is as simple as making a pull request in GitHub to pull those from whatever branch you are using into the respective production branch.
Note: While this site is built using Antora, there are many other templates and site generators available. You can easily modify the build.sh file, and run the container locally to try different static generators to see what the output is. Keeping this capability for local generation can also be advantageous if you wish to move to a different web host, or if you just want to copy html files directly to a provider.
Editing website files in IntelliJ IDEA Community
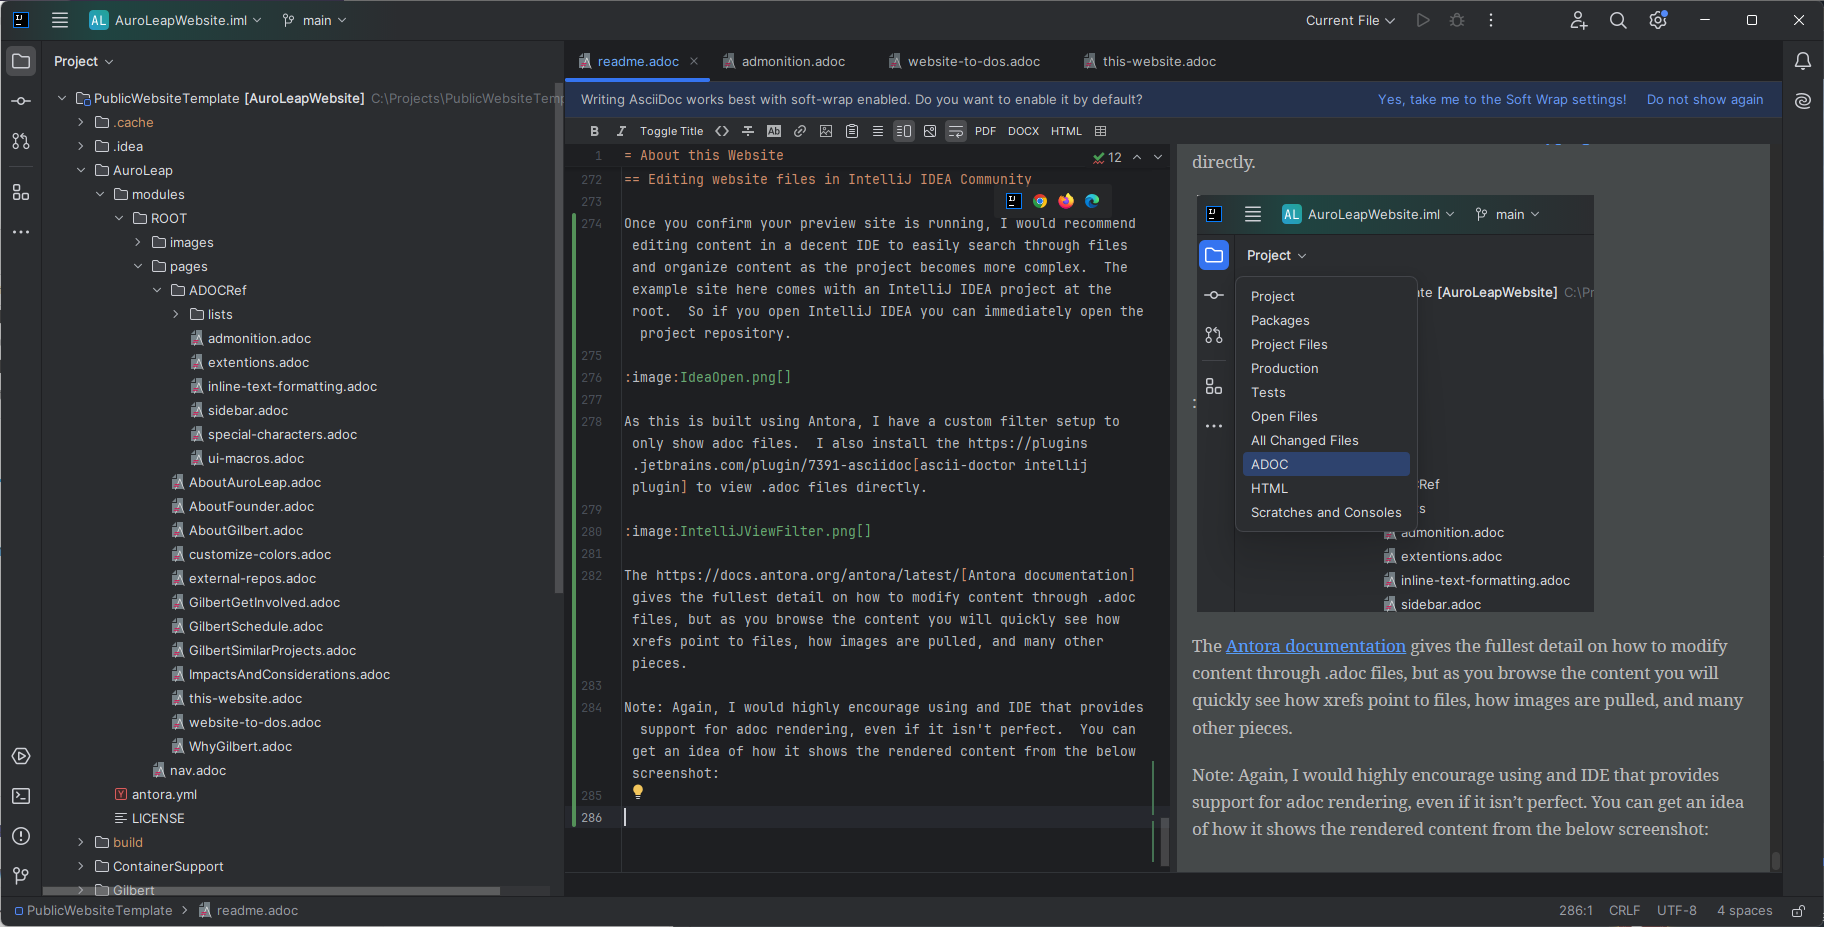
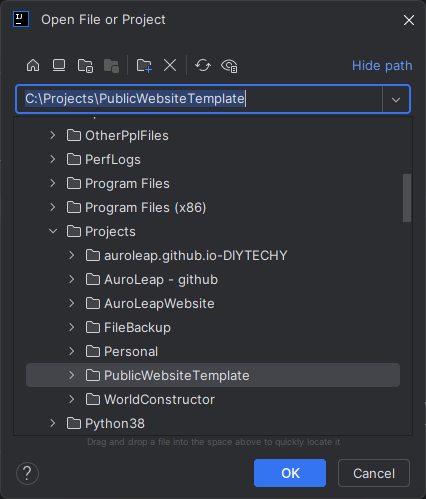
Once you confirm your preview site is running, I would recommend editing content in a decent IDE to easily search through files and organize content as the project becomes more complex. The example site here comes with an IntelliJ IDEA project at the root. So if you open IntelliJ IDEA you can immediately open the project repository.
:
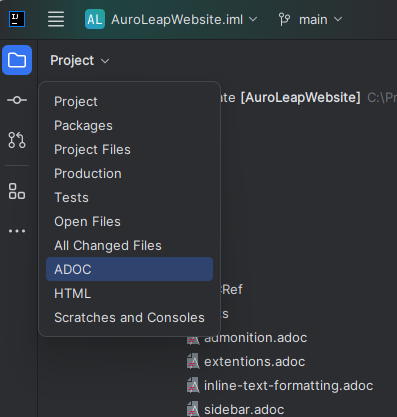
As this is built using Antora, I have a custom filter setup to only show adoc files. I also install the ascii-doctor intellij plugin to view .adoc files directly.
:
The Antora documentation gives the fullest detail on how to modify content through .adoc files, but as you browse the content you will quickly see how xrefs point to files, how images are pulled, and many other pieces.
Note: Again, I would highly encourage using and IDE that provides support for adoc rendering, even if it isn’t perfect. You can get an idea of how it shows the rendered content from the below screenshot:
: